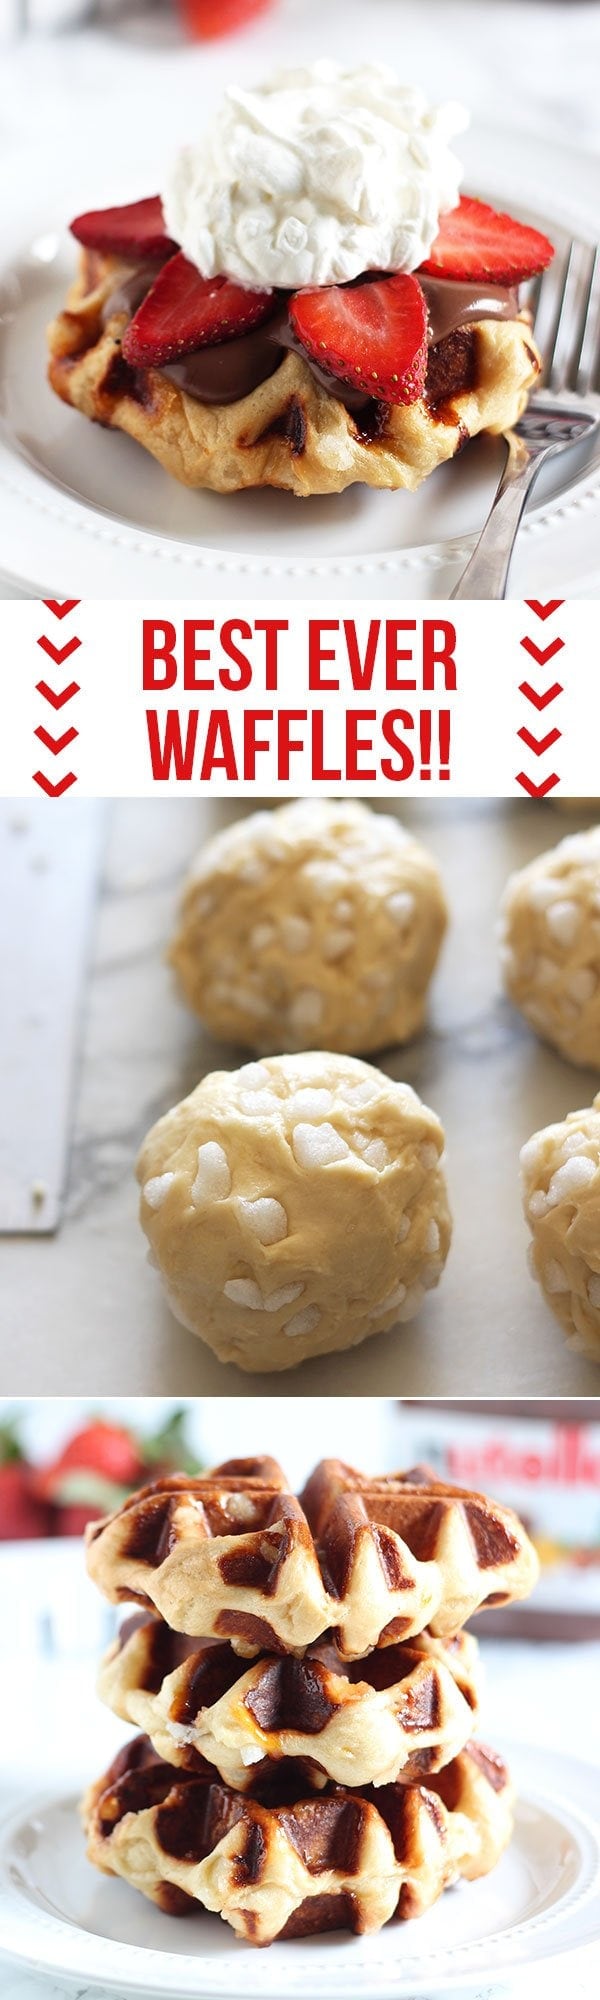
How to Make Belgian Liege Waffles - the BEST waffles ever! Includes a step-by-step video and tons of recipe tips so your waffles turn out perfect. Top them with fruit, Nutella, and whipped cream or ice cream for a truly outrageous breakfast or dessert!
Yield:
10 waffles
Prep Time:30minutes
Cook:30minutes
Tessa's Recipe Rundown...
Taste: Completely customizable based off your toppings, but the waffles themselves are definitely sweet.
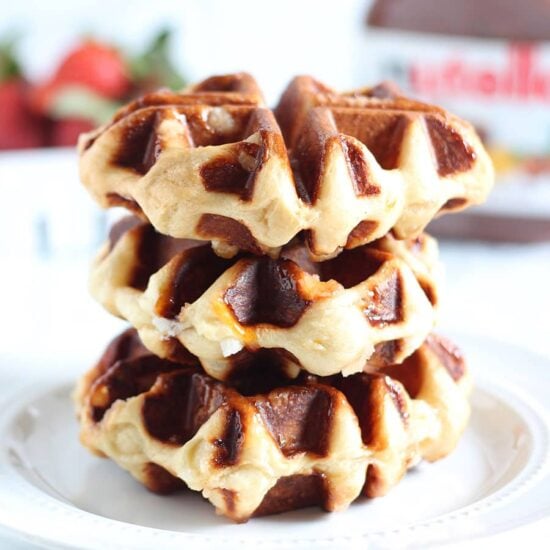
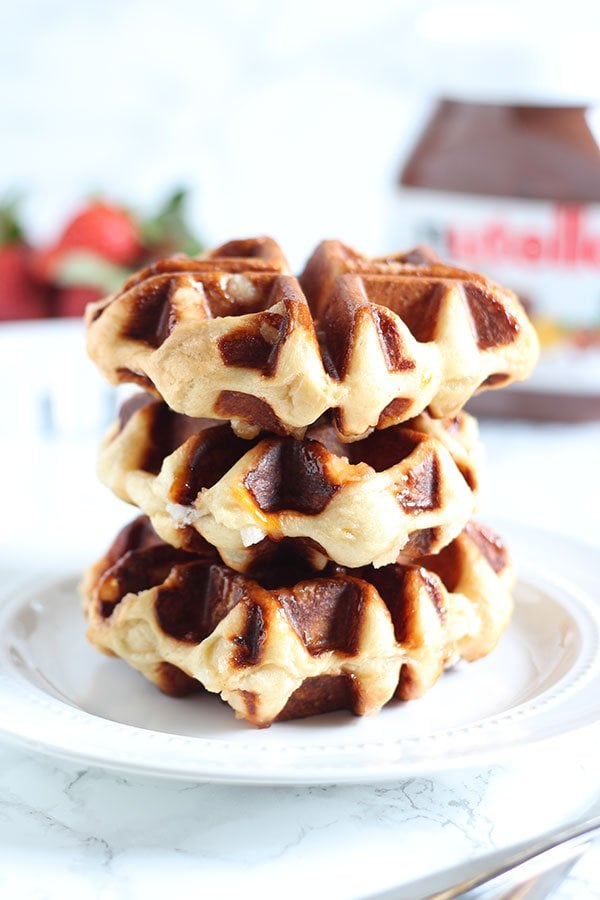
Texture: The best part. The bites of crunchy caramelized sugar pearls throughout are to die for when contrasted with the ultra fluffy yet slightly chewy texture. It's difficult to describe but just trust me, if you've never had a Liege waffle you must try one.
Ease: Not the quickest or the easiest, but that's why I've created the video above and included all those tips & tricks. You can do it!
Appearance: Who could pass up on a bite? No one!
Pros: The best waffles ever, hands down.
Cons: Definitely a special occasion recipe.
I make this again? We've already dug into the leftovers!
If you’ve never had a Belgian Liege Waffle at a restaurant, while traveling, or at a food truck, then you MUST try one asap. Luckily for you I’m sharing my favorite recipe, a step-by-step video, and all my best tips to help you make these incredible waffles.
They’re made with dough instead of batter, and it makes ALL the difference. There’s also made with pearl sugar, which is like the best secret ingredient ever. My favorite part about these waffles, though, is that you can top them with whatever your heart desires for a truly delightful treat. Check out the video below to see how they’re made! Let me know if you have any questions in the comments.
Belgian Liege Waffle Recipe Tips
Although these waffles require a bit of time and patience, they are SO worth it. I’ve included all the recipe tips and advice I could think of for you just below. Comment with any other questions!
Dough?!
Yes, these waffles are made with a yeast raised dough, not a batter. This means they need a bit more love and attention than batter waffles but they are SO MUCH BETTER. Most dough recipes can be kneaded by hand if you don’t have a stand mixer, but I wouldn’t recommend it for this one. Watch the video above to see how cubes of butter are incorporated into this dough to make it ultra rich and flavorful. Doing this by hand would be challenging and messy.
The dough needs 2 hours for its first rise. Then, it needs to sit in the fridge overnight, or up to 24 hours. There’s no rushing this process if you want the best waffles. Plan ahead!
Instant yeast?
I always work with instant yeast because it’s so easy. It’s also called rapid-rise or quick-rise. If you don’t have it, you can always use regular active dry yeast. You’ll need to combine the active dry yeast with the warm milk and water for 5 minutes, or until frothy, before you can add proceed with the recipe.
Pearl Sugar
Part of what makes a Belgian Liege waffle so special is the addition of pearl sugar. It translates to little bites of slightly crunchy, slightly caramelized sugary heaven. Pearl sugar is pretty difficult to find in the U.S., so I just order it on Amazon. The stuff isn’t exactly cheap, but it’s well worth it for a special occasion. If you don’t want to deal with that, you can also break up sugar cubes into smaller pieces. Not quite the same but close enough!
Cooking
Of course, these wouldn’t be Belgian waffles without a Belgian Waffle Iron! It might seem strange to cook dough instead of batter in a waffle iron, but it works beautifully. The pearl sugar starts to caramelize and can make a bit of a mess inside the waffle iron, so it’s a good idea to take a little wad of paper towels to wipe it down every few waffles. Just be careful not to burn yourself. Use heat resistant tongs (wood or silicone coated to avoid scratching the nonstick waffle iron surface) to remove the waffles to a baking sheet once cooked.
UPDATE: To those asking if you can use a regular waffle iron for this recipe, reader Judit recently gave it a try and reported, “definitely not disappointed!!! These are absolutely AMAZING!!!!” Check out her picture:
Make Ahead
The waffles can be kept warm in a 200°F oven until ready to serve.
If you want to freeze waffles, shave a minute or so off the cooking time so they won’t overcook when you reheat. Place the waffles on a baking sheet and pop into the freezer until solid. Remove to airtight containers and keep in the freezer for up to 2 months. Reheat in a 250°F oven, or until completely warmed through.
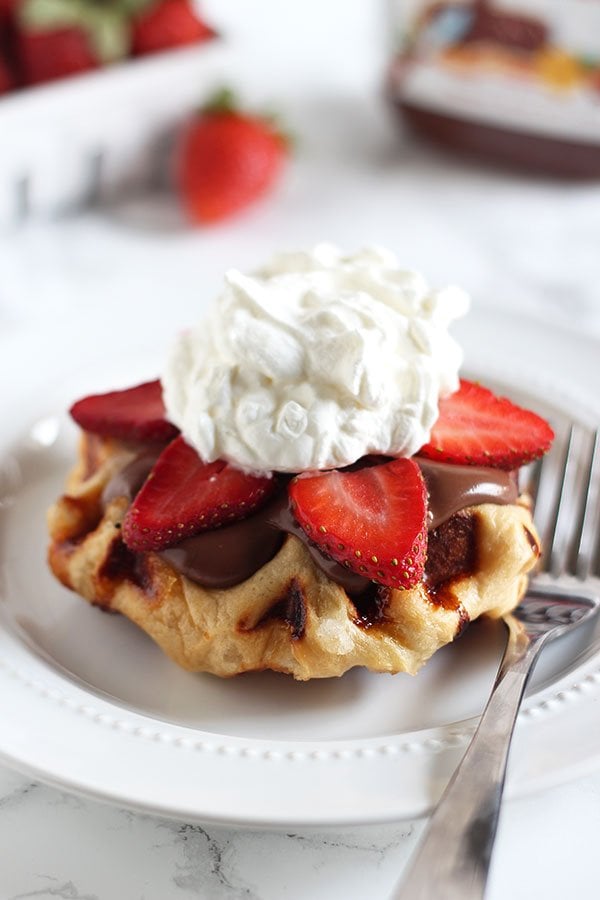
Toppings
The options for toppings are truly limitless here. My favorites include:
-Nutella (duh!)
-Peanut butter
-Cookie butter (see my post for making DIY Cookie butter here)
-Salted caramel
-Dulce de Leche
-Fruit (strawberries, bananas, and raspberries are my go-to’s)
-Whipped cream (always homemade)
-Ice cream
-Cinnamon sugar
-Lemon curd
4.43 from 19 votes
How to make
Belgian Liege Waffles
Yield:10waffles
Prep Time:30 minutesminutes
Cook Time:30 minutesminutes
Inactive Time2 hourshours
Total Time:3 hourshours
How to Make Belgian Liege Waffles - the BEST waffles ever! Includes a step-by-step video and tons of recipe tips so your waffles turn out perfect. Top them with fruit, Nutella, and whipped cream or ice cream for a truly outrageous breakfast or dessert!
Ingredients
1/2cupwhole milk, lukewarm
1/3cupwater, lukewarm
3teaspoonsinstant yeast
2large eggs, at room temperature and beaten
1tablespoonvanilla
2tablespoonshoney
3tablespoonslight brown sugar
3/4teaspoonfine salt
3 2/3cups(16.5 ounces) bread flour
2sticks (8 ounces) unsalted butter, cubed and at room temperature
1 1/2cups(8 ounces) pearl sugar (or sugar cubes, broken into pieces)
Directions
In the bowl of an electric mixer fitted with the dough hook, combine the milk, water, yeast, eggs, honey, vanilla, sugar, and salt. Mix until well combined.
On low speed, add in all but 1 cup of flour and mix until combined. On low speed, add the butter, one cube at a time, thoroughly kneading in each addition and scraping down the bowl as needed before adding in any more butter. Once all the butter has been incorporated, add the remaining flour and knead on low speed until the dough is smooth and elastic, about 5 minutes.
Remove the dough to a lightly oiled bowl and cover tightly with plastic wrap. Let rise until doubled, about 2 hours. Punch the dough down, cover again with plastic, and place in the fridge overnight or up to 24 hours.
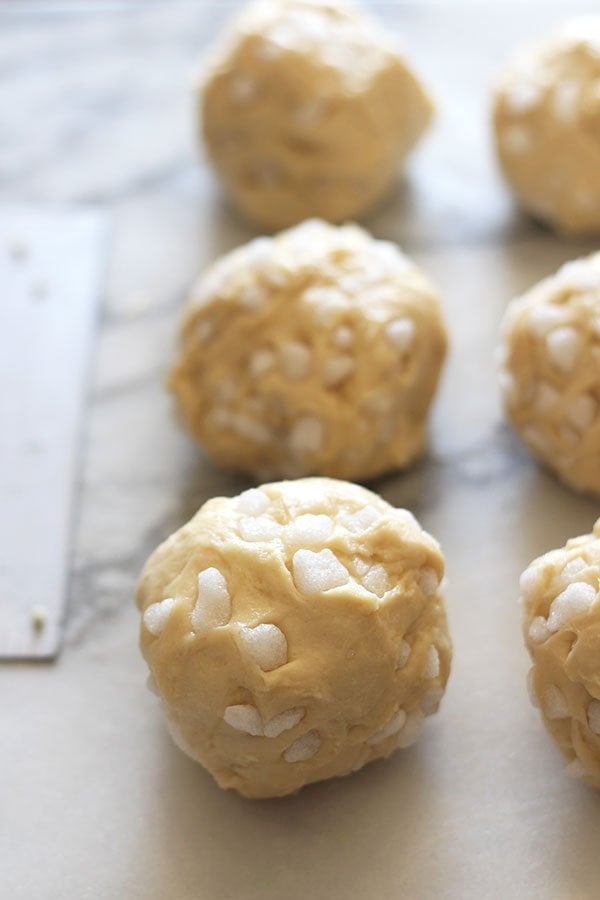
When ready to cook, heat up a Belgian waffle iron. Remove the dough from the fridge and knead in all of the pearl sugar. Divide the dough into 10 equal pieces and roll each piece into a ball.
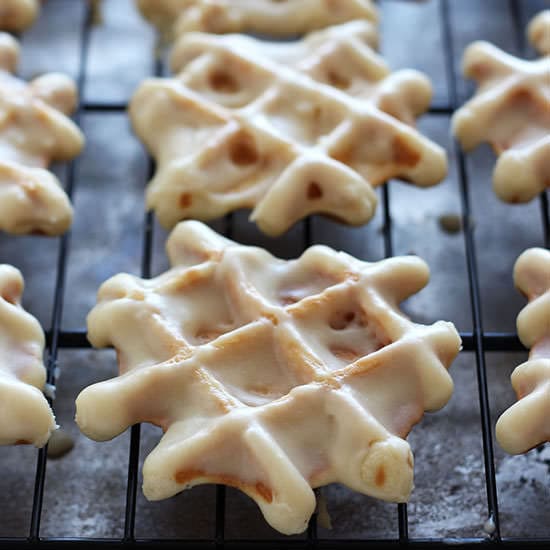
Place first ball of waffle dough on grid and cook according to waffle maker’s instructions. Cook until deeply golden all over, about 4 to 5 minutes. Carefully transfer with tongs or a fork to baking sheet.
Keep waffles warm in a 200°F oven if you plan to eat them right away. These waffles must be served warm or the pearl sugar will harden. Freeze any leftover waffles and reheat in a 200°F oven until warmed through.
I share trusted baking recipes your friends will LOVE alongside insights into the science of sweets. I'm a professionally trained chef, cookbook author, and cookie queen. I love to write about all things sweet, carb-y, and homemade. I live in Phoenix, Arizona (hence the blog name!)
About Tessa...
I share trusted baking recipes your friends will LOVE alongside insights into the science of sweets. I'm a professionally trained chef, cookbook author, and cookie queen. I love to write about all things sweet, carb-y, and homemade. I live in Phoenix, Arizona (hence the blog name!)
These were soooo good! I used to get them at a coffee shop before I moved. So happy to know I can make them at home! I used a Dash Mini Waffle Maker for these and I’m shocked that there were no issues with cooking or cleaning. They came out so well!
I had high hopes for these but the sugar gets too hardened up while making the rest of the dough…. even while putting the made ones in the oven at 200, they still get too hard. Very sad and unpleasant finished product considering all the work that goes into these. Photographs well, but still has to be edible.
As a trained chef and cookbook author, I share trusted baking recipes your friends & family will love alongside insights into the science of sweets. I help take the luck out of baking so you *always* have delicious results! Learn more here.
Over 200 pages with 50+ cookie recipes that'll make
you a COOKIE PRO. Discover how to turn your biggest cookie flops into WINS by mastering the
sweet science of baking. Even learn how to customize your own recipes! Beautiful, hardcopy,
full color, photos of every recipe so you know EXACTLY how your cookies should look. Order
now to have the book delivered to your doorstep!
Do you want a more delicious life?
Instead of digging through cookbooks and magazines and searching the internet for amazing
recipes, subscribe to Handle the Heat to receive new recipe posts delivered straight to your
email inbox. You’ll get all the latest recipes, videos, kitchen tips and tricks AND my
*free* Cookie Customization Guide (because I am the Cookie Queen)!


I love this recipe. dough gets super sticky and is easier to use stand mixer. I use less pearl sugar than recipe suggest.
These were soooo good! I used to get them at a coffee shop before I moved. So happy to know I can make them at home! I used a Dash Mini Waffle Maker for these and I’m shocked that there were no issues with cooking or cleaning. They came out so well!
I had high hopes for these but the sugar gets too hardened up while making the rest of the dough…. even while putting the made ones in the oven at 200, they still get too hard. Very sad and unpleasant finished product considering all the work that goes into these. Photographs well, but still has to be edible.